Garry’s Night Photography

Ryoshi Japanese Garden + moonrise, Ubud, Bali
Photo: © Garry Benson 2014
Introduction
Nightlife anywhere in the world is a fascinating subject to photograph. And most times the sad part is that we won’t see the beauty in front of us until someone else comes into our hometowns, or cities, and shoots what they see from their perspective.
We very rarely appreciate what we have and this is definitely the case when we’re talking about photographing the local nightlife. Think about it.

Honolulu towards Waikiki, Oahu, Hawai’i.
Photo: © Garry Benson 2014
Photo ©2014 Garry Benson
We’ll happily go to another city and photograph all that we see there and think it fascinating, but isn’t that just what other people are doing when they come to where we live?

The Eiffel Tower & the city of Paris.
Photo: © Garry Benson 2014
So is it feasible to think that there might be something that you can do with the nightlife in your area? That’s why I took myself up on the offer to go paint the town red during last year’s trip to Paris – figuratively speaking of course.
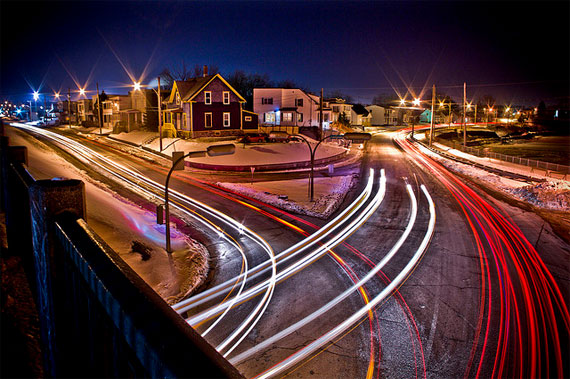
Photo: © Garry Benson 2014
Trails of Light (Cars)
There are a few different ways that you can go about nightlife photography and it all depends on how you want your shot to turn out. But one of my favorite nightlife shots is the one with the trails of light from passing cars.
This can be accomplished simply by getting yourself to a good vantage point overlooking a highway or any major road for that matter. The more centralized and in the hub of the city life, the better your shot will turn out.
The road in the foreground with a backdrop of illuminated city life works wonderfully, but as ever, everything depends on where you are. After composing your shot, set your camera to a lengthy shutter speed and just wait as it soaks up the car trails as time passes by. This type of shot also works very well along beachfronts with a boardwalk along it. The car trails look amazing against this backdrop.
Stars
And if you’re interested there is also the possibility for you to take stars as well. In this instance you need to be a significant distance away from the bright lights of the city or they will drown out the light of the stars.
Again set your tripod and camera up in a convenient place and aim the camera lens towards the heavens. Set the shutter speed on ‘bulb’ if it has that setting or set it manually to the longest possible shutter speed.
Since you need at least a few minutes to get any significant stars registered on your camera you will need to display a little patience here, but I can tell you that the results are well worth the wait.

Photo: © Garry Benson 2014
Tips: weather and exposure
Who doesn’t love the night sky? Whether you are admiring the stars, or a really cool array of light, there are probably many night pictures that have been burned into your mind, right? Well, why not capture them on camera?

Photo: © Garry Benson 2014
If you have been intimidated by night photography, or have failed at it in the past, there are a few simple tips that can help you take better nighttime photos.
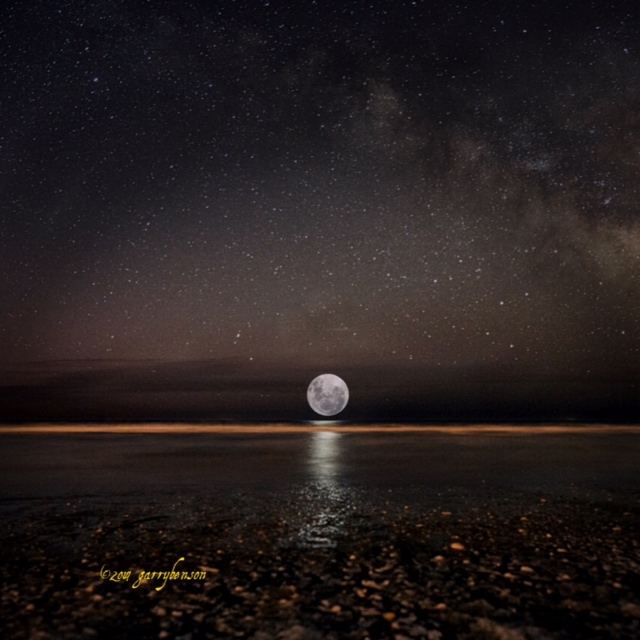
Photo: © Garry Benson 2014
First of all, it is always a good idea to know when you should and shouldn’t attempt to take a nighttime picture. That way you won’t get so frustrated and waste your time!
You will notice some really stunning natural lighting colours available at this time, as opposed to completely dark. You should take a little time to check out the weather and know ahead of time what you may encounter that evening. If there is a chance of rain and it is cloudy, you won’t have much time to capture the stars, if any at all! Also, the location of your shoot is important.
If you want to capture incredible details and use less flash, then using a longer exposure time is the only way to go. If you are going to use a long exposure, make sure that you use a tripod, as any movement at all during the picture will cause the picture to become blurred. Also, you can capture some pretty cool effects, like car lights, when using a longer exposure. The most important aspect, aside from weather, when taking a night photo is the exposure
You need to use a longer exposure time for the night pictures. This will allow as much natural light through to the picture as possible.

Photo: © Garry Benson 2014
You will want to make sure that you know how to use and when to use your flash when taking a night picture, too. Most of the time, you probably will not even want to use your flash when you are taking a night photo. If you are taking a picture of an object, like a person, though, you will want to use your flash.
When taking pictures of the night skyline, though, it is best to use a long exposure and take advantage of the natural lighting conditions.
If you decide to take pictures at night, you will want to be able to control the photo as much as possible. Basically, you would take a shot of the area you want in your picture. Then, you take a picture of that same shot, only with the lens cap on.
The reason for this is that at night, some of the pixels in the picture will not be visually good. When you take the picture again with the lenses cap on, you will be recording the pixels again, while they are hot in your camera’s memory. You can then use those pixels to repair the bad ones in the photo, with a photo editor. (If you don’t happen to have a photo editor, you can download one for free, just search for one on the Internet.)

Photo: © Garry Benson 2014
Some of the most beautiful photographs are taken at dusk. In general, it is very hard to take a great night shot, unless you learn to use long exposures. This will allow your camera to use a longer shutter speed and really take in all of the natural lighting that is available. Remember to use a tripod, so that your camera remains still during the photograph, though!

Photo: © Garry Benson 2014
On the subject of resolution, higher is better, right up until you run out of memory. You can always lose resolution during editing, but you can never add it. It’s trivially easy to shrink that 6-megapixel image for sending in an e-mail, so shoot it at maximum resolution – you’ll thank me every time you have to crop an image for content, composition or other reasons and the result is still sharp enough to use.
Tip: Tripods

Photo: © Garry Benson 2014
I’ve mentioned tripods once already – if you don’t have one and use one, you’re not taking advantage of what your camera can really do. From those tricky horizon shots to low-light photography, the stability provided by a tripod is essential to get the best shot.
There are big, heavy, expensive professional tripods that can stand up to wind but are a beast to carry. There are high-tech carbon-fibre tripods that fold up to fit in your pocket or be strapped to a tree branch.
Personally, I like the cheap collapsible tripods that you can find at bargain stores for less than $15. You can also buy a Small Tripod on Amazon. They fold up and can fit in your back pocket or camera bag, and you can make your own strap from Velcro or a bungee cord to hold your mounted camera to a branch or fencepost. Best of all, if it’s damaged or lost, you didn’t lose a sizeable investment. At this price, it’s almost silly not to have one!
The more you experiment with your camera, the better. Even inexpensive cameras will generally let you have control over some useful features, like white balance. This adjustment lets you adjust the “temperature” of the CCD sensor, to emphasize different colours.
Low cost filtering
One thing many low-to-midrange digital cameras lack is the ability to use filters. Or do they? There’s no reason a filter can’t be held in front of the lens of a compact digital camera, and you can even use sunglasses to provide filtering effects, and some of them can be pretty interesting.

Photo: © Garry Benson 2014
It’s amazing what kind of shots you can get using reflections – or seeing eye to eye…
Polarizing sunglasses can provide the same effect for the camera as they do for your eyes, reducing glare and reflections. Sunglasses can also alter colour balance and filter out certain colors, and can even be used to compensate for the washing-out of light areas that can occur when using slow shutter speeds to capture motion blur.
You should be careful what you use for a filter, and always take an unfiltered shot for comparison. Sunglasses in particular can have flaws, scratches, dust or uneven coatings that may not be easily visible until you start working on the image you just imported to your computer.