A Day in the Life of a Photographer
Text: ©2014 Garry Benson
I decided to drive to Victor Harbor to do some shopping (an 80km round trip from my remote country 10 acres), so I thought why not test drive one of our projects – A Day in the life of a Photographer. So all the photos in the following notes were taken during that one day – Saturday April 19th, but not necessarily in chronological or location order.

Image credit: Garry Benson
Identifying the subject
The first creative step in taking a photograph is to choose the subject. This may seem obvious, but any one situation usually offers a lot of choices As a general rule, you should look for a subject that will make a single strong point. The more elements there are in the scene, the more important it is to have a clear idea about what you want the picture to show at the moment you press the shutter. If there are too many details that do not support the main point, the picture will tend to look untidy ‑ a random snap rather than an effective photograph.
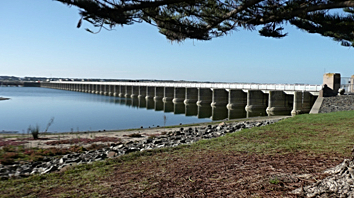
Image credit: Garry Benson

Image credit: Garry Benson
The camera, unlike the eye, is not capable of concentrating on what is interesting and ignoring the rest. Everything in the viewfinder tends to have equal prominence unless the photographer organises the scene and selects the image to bring out a particular part or aspect of it.
With an inherently disorganised scene ‑ a crowded beach, for example ‑ you need a good deal of skill to produce a broad view that does not look untidy, although the rich variety seen in a panoramic shot may have its own interest. The solution may be to find a viewpoint that allows you to simplify the picture down to a few elements.
Studied images, fleeting moments

Image credit: Garry Benson
Sometimes the world around us moves so fast that we experience moments of action, excitement or laughter almost as a passing blur. The camera’s ability to freeze these moments is one of photography’s most remarkable attributes and many of the pictures that give greatest pleasure are those that exploit it.

Image credit: Garry Benson
But in other photographs what impresses is the sense of absolute stillness and order. This is often the result of the photographer’s having had time to think hard about a stationary scene and perhaps rearrange it to make an image that is thoroughly balanced.
There are thus two contrasting approaches to taking pictures. The only way to be sure of catching these fleeting events consistently is to learn to anticipate them. This means having the camera ready, out of its case, with the controls set to the approximate light conditions and focusing distance. From then on, It is a matter of quick reactions, accurate timing ‑ and a little luck ‑ to be able to capture pictures with the immediacy of the image of the dog running on the beach.
The other, more considered, approach requires patience together with something of the artist’s eye for composition. With time and care, even the simplest objects can be arranged to make an attractive picture and one that perhaps is alive in a different way ‑ because it is charged with atmosphere.
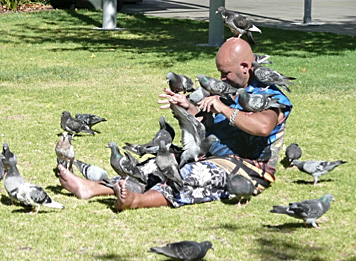
Image credit: Garry Benson

Image credit: Garry Benson
The key to successful pictures of this kind is often the lighting, which may be precisely controlled by the photographer. Even natural light can be controlled, if only by standing at a well-judged angle to the subject you are photographing or by waiting for the transformations in a landscape that occur as the sun moves or is covered by clouds.
A moment’s thought
Many first‑time camera users set about taking pictures assuming that everything will fall dramatically into place. They aim the lens directly towards the subject, lining up the most important features with the centre of the image as though the camera were a kind of rifle and the subject a target.
This approach will certainly record the subject, but is unlikely to produce an appealing image. You will achieve better results by thinking for a few seconds and allowing yourself time to study the scene carefully. Are there distracting elements in the frame that would be better excluded by changing the camera position?
Image credit: Garry Benson
Is the vertical format ‑ used for the shot here of a sunset ‑ more suited to the subject than a horizontal one?
Image credit: Garry Benson

Image credit: Garry Benson
Are there patterns ‑ as in the above picture ‑ that can be used to give the picture a bold visual structure? With practice, this self-questioning process becomes automatic, a rapid sequence of mental trial and error. But for the beginner ‑ and even for the expert ‑ a conscious pause for thought can make all the difference between an ordinary snapshot and a picture with real impact.
A few simple ideas can point the way. First, placing the main subject slightly off‑centre in the frame can create a more balanced and visually satisfying effect than composing directly around the picture’s centre. Strong lines can also affect the mood you want to achieve ‑ diagonals suggest direction and even movement, and are useful for leading the eye into and out of the picture. These are only a few of the elements of composition that you should take into account in making a picture something more than a visual jumble ‑ and many more will become apparent as you begin to develop visual awareness.
Individual vision
Every good photographer eventually develops a way of taking pictures that is personal and distinctive. A few are lucky enough to have such an individual way of seeing that this distinctiveness surfaces from the moment they pick up a camera. To others it comes later, as they gradually begin to master the mechanics of taking pictures.
Experimentation is important, because if you try different approaches you are more likely to discover the type of picture‑taking that suits you best. As a starting point, concentrate your interest on a particular subject ‑ you may be drawn to photographing a close companion, or landscapes, or sports, or close‑up details. This does not mean you have to stick exclusively to a favourite subject to develop a style. This shot of my friend Tanya and her family is taken solely with natural light (no flash).
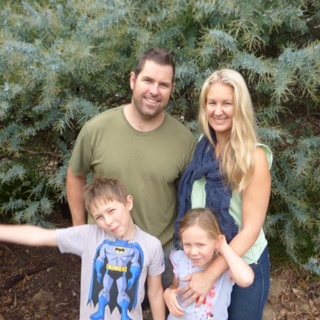
Image credit: Garry Benson
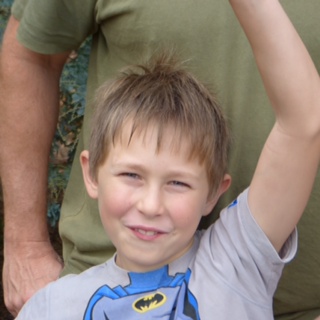
Image credit: Garry Benson
Zeroing in on one target eliminates the uncertainties of less familiar subjects or situations so you can centre your efforts on experimentation and perhaps find an approach that is essentially your own. And OK, I did organise to photograph of Lockie (below).
Viewpoint
One of the simplest ways of achieving better pictures is to learn where to stand in relation to your subject and at what level or angle you should position the camera. Walk around looking at the subject through the viewfinder from different positions and angles. Think about whether you could improve the picture by moving closer, or standing farther back, or shooting from a low or high viewpoint. Simply moving the viewpoint is one of these ways can make the difference between a mundane picture and one that is truly striking. With this photo of young Lockie I could use flash, but the modelling light works better.
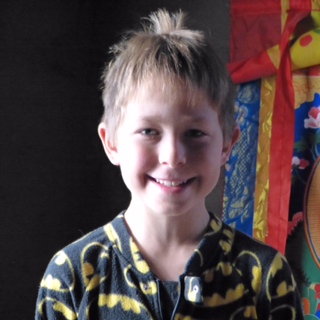
Image credit: Garry Benson
Usually when you are photographing children, you should keep the camera level and point it directly at the subject. Even so, you should try different camera positions ‑ to concentrate attention by moving in close, for example, or to include more of the surroundings by moving back. The choice may depend on whether you want to cut out a distracting background by moving in, or to add an interesting foreground with a longer view.
Willingness to experiment will reveal many possibilities beyond the straightforward head‑and‑shoulders shot. Dramatically high or low viewpoints, or positions very close to the subject’s face may just create ugly distortions. But provided the distortion is calculated, rather than an unwanted side effect, there is no reason why you cannot succeed with an unusual approach.
With other subjects, your approach can be even freer. Buildings often look stunning when photographed from below, with the camera tilted steeply upward, and you can often bring out the pattern of city streets by shooting directly downward from a tall building. An ordinary tree could be intriguing seen from so close that only bark and a few leaves are in the frame. Whatever your subject and your intentions, try all the possibilities you can think of ‑ and then look for more.
Recognising patterns and outlines
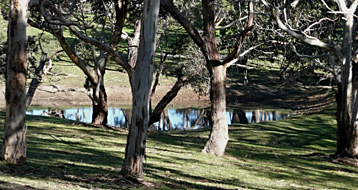
Image credit: Garry Benson
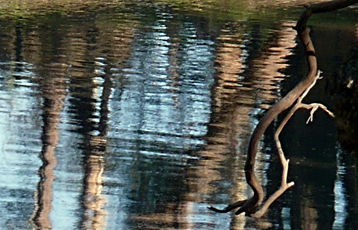
Image credit: Garry Benson
The world is rich in bold outlines and rhythmic patterns that have strong visual attractions when they are isolated and emphasised in photographs. Finding interest in them is largely a matter of forgetting for the moment that you are looking at things in a literal way ‑ as trees, buildings or individual people ‑ and trying to see the underlying design of the picture. Learning to see patterns and outlines will help you to produce less haphazard photographs even when these more abstract visual qualities are not the main point of the picture.
Patterns are everywhere, and the camera’s ability to close in on the most significant parts of a scene enables you to accentuate such patterns by framing the shot to exclude more random elements. Similarly, you can emphasise patterns by viewpoint and camera angle.
Outlines are somewhat harder to recognise, because in the real world we do not usually see things in terms of flat areas of shape or colour, except when they are silhouetted. But photography has a particular capacity to transcribe the three-dimensional world in terms of basic outlines ‑ especially when light is coming from behind the subject.

Image credit: Garry Benson
You can produce simple, forceful pictures by deliberately placing the subject between you and the light and choosing an exposure for the background rather than for the immediate subject. For best results, there should be a difference of at least three stops between subject and background. Alternatively, shapes can be emphasised by contrasting a light subject against a dark background, or a shape of one colour against a plain background of another hue.
So what has this to do with travel photography? When you’re travelling you have to think on your feet. As a cinematographer I have to tell a story in logical progression… I try to do the same with my travel stories. Take a setting or wide shot of the scene, then a series of stills to explore details. Memory cards are cheap and you may never return to that location, so take lots of shots.
Try my experiment and record a day in your own life and look critically at the result. Does it work as a story, and what’s the quality of the shots like? Have fun…
Garry Benson
very helpful, thanks
Thanks 🙂
Hi, Ive come over to have a look at the request of Ed Mooney who I follow. I also love to travel, France was my favourite but becoming more and more enamoured with Australia of late and want to see me of our great land. I love landscape photography and look forward to seeing more of your posts.
Thanks for dropping by – I hope you will enjoy our posts 🙂